by Cassandra Balentine
Many three-dimensional (3D) printed objects require post processing before they are considered complete. Surface finishing is often utilized for 3D printed products in aerospace, medical, and automotive industries that yield metal or polymer parts, these are able to be finished into smooth, polished pieces.
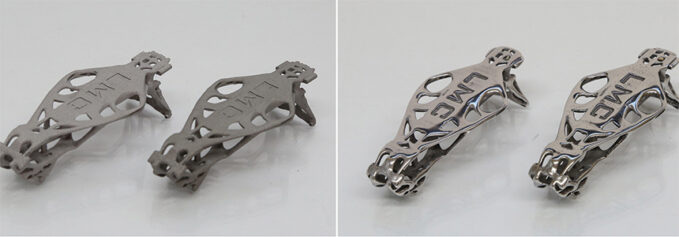
Above: MFI offers many types of tumbling equipment for use in medical, aerospace, automotive, dental, and defense industries.
“To achieve the desired final finish for your printed parts, consider three main factors that are often ignored by manufacturers—how to post process the parts after the build, how to deal with the high surface roughness of the printed parts compared to machined or casted parts, and how to specify the surface requirements on the part print,” explains Andrew Garganese, marketing, Bel Air Finishing Supply Corporation.
The type of post-processing finishing varies depending on the desired outcome or purpose of the part. “Will it be a visual prototype? Is it a part that is not visible but needs to meet certain criteria for mechanical properties? Is it a functional end use product?” asks Mike Schorr, GM, DyeMansion North America.
Each industry has different needs and Schorr points out that for prototyping there usually won’t be much attention paid to the surface finish beyond standard depowdering, mechanical surfacing, and possible color. “When you move towards end use consumer-grade products, then generally a specific color is needed and the requirements for the surface change.”
Schorr feels that it’s at this point when surfaces become more critical and appealing to the end user.
Varying Techniques
Post processing is an essential step to improve the appearance and performance of printed parts. It can remove excess material, smooth out rough surfaces, and enhance the mechanical properties of the parts.
Garganese stresses that post-processing methods vary depending on the part type and geometry, so you need to “plan ahead and choose the most suitable method for your design.”
A variety of post-processing surface finishing techniques are utilized today, including bead blasting, shot peening, media tumbling, polishing, sanding, heat treatments, plate treatments, and vapor smoothing.
Bead Blasting
To access challenging-to-reach areas, a blog post by Snapmaker US, Comprehensive Guide to 3D Printed Parts Surface Finishing, says bead blasting is the ideal solution. “Through this procedure, you can utilize a spray gun to shoot finely reground thermoplastics onto the surface in order to remove any imperfections and produce a smooth finish—much like sanding does but far quicker. Not only will it improve your end product’s aesthetic appearance with its matte finish, but it also acts as an efficient means of prepping materials before adding coating so that they adhere correctly.”
In order to avoid dents in the material, Snapmaker suggests using bead blasting and starting out on a low pressure setting and slowly increasing if required. “Too high of a pressure or lingering on one area for too long can obliterate ample amounts of the part you are working with.”
Shot Peening
Shot peening works similar to bead blasting, yet it has an alternate purpose. Snapmaker’s blog says that instead of eliminating any undesirable imperfections from the surface, this technique primarily serves to enhance the part’s strength and durability. With shot peening, high-pressure air blasts minuscule metal or plastic beads at the object’s exterior in much the same way as with bead blasting. These particles then make shallow pits on its face under, in which compression strains form when they overlap. Therefore, shot peening increases the component’s ability to resist wear and tear while also increasing longevity.
“The compressive stress, which reduces the size of an object, replaces tension in the item that would otherwise expand its length. The compression makes the surface more resilient and better able to defend itself against fatigue, wear and tear, cracking, and cavitation erosion,” shares the Snapmaker blog.
Mechanical Surfacing
Mechanical surfacing is a media blasting or shot peening process, where the parts are generally placed in a process chamber that tumbles the parts while exposing them to blasting media. “The blasting media uniformly smoothes the surface without removing critical geometries or dimensions. The result is a smooth, yet matte surface with pleasing haptics,” explains Schorr.
Media Tumbling
Tumbling works across all manufacturing industries, says Cole Mathisen, sales and marketing manager, Mass Finishing, Inc. (MFI). There are many types of tumbling equipment including vibratory, centrifugal disc, drag or spindle, and centrifugal barrel.
MFI’s centrifugal barrel tumbling machines use four barrels or work chambers that are mounted on a drum and rotate in a planetary or ferris wheel like pattern. “This one-to-one barrel to turret ratio creates a wave inside the barrel. The parts are tumbled with various types of media including ceramic and plastic shapes that have abrasive material baked in. The rubbing of media against the parts creates a perfect isotropic—even in all directions—finish. This is superior to sanding or buffing that can leave directional patterns on parts,” says Mathisen.
MFI’s HZ Series of nine sizes of centrifugal barrel tumblers are used in medical, aerospace, automotive, dental, and defense industries along with many others including jewelry. “Depending on the size and geometry of the part, we have smaller and larger machines and different media sizes to affect different part features,” notes Mathisen.
With rough parts, MFI typically suggests a highly abrasive ceramic media for 45 to 90 minutes to smooth out the rough surface and get the finish down to around 45 microinch Ra. From there it uses a finer abrasive type media for 30 to 60 minutes to blend and smooth the surface further to a 15 to 25 microinch Ra. Then it will use a polishing media like porcelain or MFI’s treated corn cob to get the parts to a mirror or sub 8 Ra finish.
Sanding
In a Formlabs article, Guide to Post-Processing and Finishing SLA Resin 3D Prints, the company says sanding 3D printed parts is often the best method for smoothing edges, removing blemishes, and getting rid of any leftover support marks.
“Hand sanding is most effective on simple shapes, but it can be hard or nearly impossible to sand complex objects with deep crevices and internal supports. Media blasting or polishing might be more effective solutions in these cases,” notes the post.
Heat Treatments
3D printed objects may also undergo one of several various types of heat treatments as part of the finishing process. Surface Treatment Experts offers the Guide to Surface Finishing for 3D Printed Parts on its website, which details how heat treatment works.
The article points out that heat treatments strengthen a material by reducing tensile pressure. It evens out the high and low stress areas of an object, helping to prevent failures. You might also use heat treatment to increase density or help form the item into the final desired shape.
Plating
Electroplating transfers metal atoms from one metal to another when they are in a solution and have electricity pass through them. When you choose this method for coating 3D printed objects, you will enjoy multiple advantages compared to other means of finishing the project, offers Surface Treatment Experts’ blog post.
Vapor Smoothing
Schorr explains that vapor smoothing uses controlled vapor exposure to smooth outer layers of 3D printed parts by slightly melting the surface, closing pores, and reducing roughness. Parts that go through a vapor smoothing process usually need to be suspended in a process basket or chamber so that the entire part can be exposed to the vapor and to ensure an even, homogeneous surface finish. The result is a fully sealed part that has a smooth, shiny surface.
“Medical industries generally will turn towards vapor smoothing as a key asset to enable a sealed, washable, and more biocompatible surface,” says Schorr.
Aerospace and other defense customers may use vapor smoothing to enable watertight and sealed parts that can withstand the elements. “Mechanical surfacing on the other hand creates a finish that’s similar to some traditionally finished parts,” notes Schorr.
Important Step
Post processing is an important step in 3D printing, as it affects the function and appearance of the printed parts, stresses Garganese.
Different post-processing methods suit various parts, depending on their shape, size, material, and surface requirements. Before choosing a post-processing method, one should consider the following factors—the function and aesthetic needs of the part; the compatibility of the post-processing method with the existing manufacturing systems; the scalability of the post-processing method with the production volume and part diversity; and the surface characteristics of the part, both exterior and interior; and how they vary with the printer technology and build parameters.
Some common mistakes to avoid when designing 3D printed parts are replacing an existing part with a 3D printed part without considering the surface limitations and functionality of the new part; designing 3D printed parts that have complex or inaccessible surfaces that are hard to post process; or using a printer technology that does not match the surface requirements of the part.
Final Step
Many 3D printed objects benefit from post processing, especially in instances that go beyond prototyping and require polished final products. The technique used varies based on the part’s shape, size, material, and surface requirements.
Oct2025, Industrial Print Magazine